DIRECTIONS
1.) Cut all pieces as per drawing and as follows (verify dimensions to fit your saw)
- Table Top: ¼” Plywood
- Table Top Support Frame: 1 ¾” Square, Pine
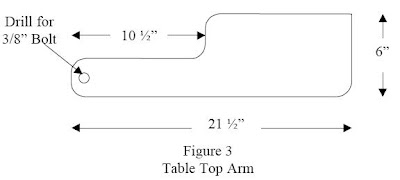
- Table Top Arm and Leg Brace (2ea): ¾” Plywood
- Legs (2ea): 1 ¾” x 1” Pine
- Main Supports (2ea): 1 ¾” Square, Pine
3.) Screw the Support Arms to the Frame with 1” screws, using the back of the frame as the reference
4.) Screw the Leg Braces to the support arms and tabletop using 1” screws.
5.) Bolt each Main Support to Saw Table legs using two 3/8” x 3” carriage bolts and wing nuts for each support. Make sure the Supports fit inside the Arms using one washer between them. . NOTE: the table top should be slightly lower than the saw table (approx. 1/16”) towards the saw and exactly level at the rear
6.) Fasten the Table Top Assemble to the Main Supports Using 3/8” x 3 ½” Carriage bolts washers and nylon lock nuts
7.) Legs: The legs are designed so that they can be stored under the table when not in use and also adjust the table height for fine-tuning. One leg is shorter than the other (by 2”), so it will be positioned lower on the leg brace, this allows them to be stored as shown in the diagram.
8.) Drill the holes and assemble the leveling bolts into the legs as shown. Screw in the leveling bolts leaving 1” of threads exposed. With the table attached to the saw raise it up and clamp the legs into position. . NOTE: the tabletop should be slightly lower than the saw table (approx. 1/16”) towards the saw and exactly level at the rear. Mark the location of the leg holes on the Leg Brackets. CAUTION: The legs have to swing up for storage so the hole mounting locations are not identical on the brackets and they are not centered on the table. Drill pivot hole and install 3/8” x 3” carriage bolts, washers and wing nuts. Use a Rubber Washer between the leg and the bracket, this adds friction and helps hold the leg in place during both use and storage.


0 comments:
Post a Comment