Wednesday, August 8, 2007

TRADITIONAL CEDAR BIRDHOUSE

NOTE: All parts to be made from 1"x6" (3/4" thick by 5-1/2" wide) cedar fence board.
Therefore, all dimensions shown 5-1/2" will not require cutting. If a board other
than 5-1/2" wide will require additional cuts.

STEP #1
Make (2) side wall panels as shown in Figure #1.


STEP #2
Make (1) front wall panel as shown in Figure #2.

STEP #3
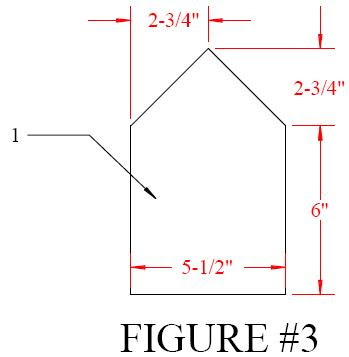
Make (1) back wall panel as shown in Figure #3. Use front panel as a template for back panel to ensure both panels are identical.
STEP #4
Assemble (2) sides, front, and back panels as shown in Figure #4. Glue and nail (3 nails per joint) each joint.

STEP #5
Make (1) bottom panel by placing assembled walls on top of oversized, future bottom panel, board as shown in Figure #5. Mark (2) edges to be cut from inside of birdhouse as shown in Figure #5. Cut on marked lines. Install bottom panel inside assembled walls with glue and nails (2 nails per side).

STEP #6
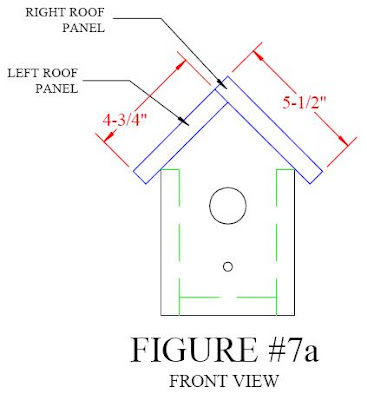
Make (1) right roof panel and (1) left roof panel as shown in Figure #6a and Figure #6b.


STEP #7
Install roof panels on house walls as shown in Figure #7a and Figure #7b. Glue and nail (2 nails per end and 3 nails along ridge) roof panels.


STEP #8
Cut a 4" long piece of 3/8" diameter wood dowel. Glue and insert dowel into 3/8" diameter hole previously cut into front panel of bird house.


Tuesday, August 7, 2007

Dog House Project Plan


MATERIALS AND CUT LIST

Buy: 2—Pressure treated 2 x 4 x 8'
Cut: 2—Front and rear bases, each 30" long
1—Center floor joist at 33" long
2—Side bases, each 33" long
Buy: 3—2 x 4 x 8'
Cut: 1—Roof ridge brace 36" long
4—Corner studs at 24¹⁄₂" tall, cut 45° miter on one end of each
4—Fascias at 28" long, cut 45° miter on one end of each
Buy: 1—¹⁵⁄₃₂" x 4' x 4' Plytanium™ Sanded Project Panels
Cut: 1—Floor, 30" x 36"
Buy: 2—¹⁹⁄₃₂" x 4' x 8' Plytanium Siding with 4" on center grooves
Cut: 2—Side siding at 22¹⁄₂" high x 36" wide
2—Front and rear siding at 38" high x 31¹⁄₄" wide
1—Roof at 28⁷⁄₈" x 42"
1—Roof at 29¹⁄₂" x 42"
1—Sign at 3⁵⁄₈" x 10"(cut in grooves)
Buy: 1—1 x 2 x 8'
Cut: 2—Door jamb casing at 15", cut miter at 22¹⁄₂°
2—Door head casing at 10", cut miters at 22¹⁄₂° and 45°
1—Door sill casing at 11"
1—Threshold at 11"
Buy: Metal flashing pre-bent at 90o angle.
Cut: 42" length
Buy: Galvanized finish nails, galvanized deck screws, wood glue,primer, and acrylic latex paint or exterior opaque stain.


ASSEMBLY
  1. Before cutting, draw layout on Plytanium Sanded Project Panel as shown, centering front and rear siding on grooves.
  2. Nail base boards together, lapping front and rear over sides. Add a central joist at midspan (shown as dashed line on Fig. 3)
  3. Screw Plytanium Sanded Project Panel floor on top of base.
  4. Screw sides to short side of corner studs, lapping the siding 2 over the bottom of the studs. Leave ¹⁄₂" of the top of the stud exposed.
  5. Screw back and front siding to corner studs, lapping front and rear over sides.
  6. Add roof ridge brace by nailing through the front and back siding flush in the angle of the peak.
  7. Set the assembly over the base. Screw together.
  8. Nail fascia through Plytanium Sanded Project Panel to corner studs. Screw siding to fascias from inside.
  9. Screw roofs to fascias and ridge brace, lapping larger roof over smaller at ridge.
  10. Nail flashing over ridge.
  11. Nail casing around door as shown.
  12. Nail sill flush with floor.
  13. Nail threshold to cover the crack at sill and floor.
  14. Paint exterior ad lib.

Closet Organizer


This closet organizer project can help any closet reach its full,
uncluttered potential. It has compartments for suits and jackets,
long coats and dresses, shirts and blouses, pants, hats and
shoes, plus four drawers for socks and other smaller items.
Built primarily from particle board, the project is easy to set up
and take down.
The closet organizer can be customized to fit a closet of
almost any size; the center unit measures 78 inches tall by 36
inches wide by 20 inches deep.


NOTES
1. Read all instructions and check materials before beginning work.
2. Read manufacturer’s instructions before operating equipment.
3. Always wear safety glasses.
4. Use 1 1/4” finish nails and wood glue on all joints.


Particle Board Cutting Layouts


Isometric

Assembly Instructions

Read all instructions before beginning any work. Cut all material to sizes shown in cutting schedule.
Note: For steps 1 through 7 refer to Isometric.
  1. 1. Glue and nail boards B to base board C. Front board B is inset 3/4” from the leading edge of bottom board C. Back board B is flush with the back edge of bottom board C.
  2. Glue and nail bottom board C to board D.
  3. Glue and nail middle board C to board D. Check for squareness.
  4. Insert board E between bottom board C and middle board C. Glue and nail board E to boards C and D.
  5. Glue and nail sides A to boards C and D. Glue and nail top board C to sides A.
  6. Insert boards F between right side A and board E and glue and nail in place. Insert board J between left side A and board E and glue and nail in place.
  7. Glue and nail board L to boards A and top board C.
  8. Center 1 3/8” dowel supports on sides A and attach 3” below top board C.
  9. Cut and sand radius on boards G.Refer to Figure 1.
  10. Route a 3/8” dado on boards Gand H. Refer to Figure 2.
  11. Insert drawer botttom M into dados in boards G and H. Nail in place. Refer to Figure 2.
  12. Drill six 1/2” holes in board K. Refer to Figure 3. Glue dowels O into the holes.
  13. Glue and nail board K to board D. Refer to Isometric.
  14. To install the project in a 72” closet as pictured, place the central unit in the center of the closet and anchor to the back wall.Attach pine shelf supports to sides A and side walls of closet and install 18” shelves. Attach 1 3/8” dowel supports to sides A and side walls of closet and install 18” dowels. Refer to Figures 4 and 5.


Monday, August 6, 2007

Two-Door Ice Box


Although refrigerators long ago rendered them obsolete, antique oak ice boxes remain
popular with collectors, even though they’re expensive and hard to find.
This do-it-yourself version is neither: it’s both inexpensive and easy to build. An
authentic reproduction of an original, the project is especially popular when used as a
bar, but it has many other uses. The top opens up to reveal a convenient storage area,
and the lower cabinet features two compartments perfect for glassware and other fragileitems.
The ice box measures 38 inches high by 24 inches wide by 16 inches deep.
จัดเรียงทางซ้าย
NOTES
  1. Read all instructions and check materials beforebeginning work.
  2. Read manufacturer’s instructions before operating equipment
  3. Oak is preferred for this project.
  4. Edge-gluing is required to achieve the necessarywidth of boards F, H, N, X, AA and EE.
  5. When using finish nails on oak, drill pilot holesto avoid splitting.
  6. Always wear safety glasses.


Assembly Instructions
Read all instructions before beginning any work. Cut all material to sizes shown in cutting schedule.

1. Construct top lid X using three pieces of lumber, reversing direction of the grain and gluing and clamping (this will minimize warping). See Figure 1. Allow glue-up to dry thoroughly.


2. Round-over all four top edges and run a 3/8” x 3/8” rabbet around all four bottom edges of board X. See Sections A-A and B-B.


3. Mark location for dowels in pieces A, B, C, D, E, J, K, L, M, T, U, Y, Z, CC and DD and drill 3/8” holes for dowels. Refer to Detail 1.


4. Assemble and clamp face frame, side frames and door frames using 3/8” dowels and wood glue. Check for squareness. Refer to Isometric.


5. Rout a 1/4” wide by 1/8” deep rabbet around the inside edges of the openings in side panels and door frames to accommodate 1/8” plywood. See Sections A-A, B-B and C-C and Detail 1.


6. Cut a 1/8” deep by 3/8” wide rabbet inside back edge of side panel frames. See Figure 2.


7. Glue 1/8” plywood panels to inside side and door frames (do not use nails). See Detail 1.


8. Using your router, create raised center panels F, H, AA and EE. See Figure 3.


9. Glue raised center panels to 1/8” plywood inserts (do not use nails). See Isometric, Sections A-A and B-B and Detail 1.


10. Nail and glue side panels to shelves N (see Note 5). Refer to Sections A-A and B-B for position. Check for squareness.


11. Attach face frame J, K, L and M to cabinet using 1 1/4” finish nails and glue. Refer to Isometric.


12. Round-over top edges of base boards Q and R (see Section A-A and B-B). Attach boards Q and R to cabinet using 1 1/4” finish nails and glue. Refer to Isometric and Sections A-A and B-B.


13. Attach boards O and P to side frames using 1 1/4” finish nails and glue. Refer to Section B-B.


14. Round-over bottom edges of boards V and W. Align top frame T and U and molding V and W and attach using 1 1/4” finish nails and glue. Refer to Isometric and Sections A-A and B-B.


15. Nail plywood S to back of unit. Refer to Sections B-B and C-C.


16. Round-over all four edges of boards Y, Z, CC and DD on the outside of the doors. Run a 3/8” x 3/8” rabbet around all four edges of boards Y, Z, CC and DD on the inside of the doors so that doors sit 3/8” into frames. Refer to Sections A-A and B-B and Detail 1.


17. Sand and stain the project.

18. Attach top lid and doors using brass ice box hardware.